Using SSH To Connect to Access Your Unix Account
Steps: 1 - 2 - 3
- Get and Install the Software
- Download either SSH Secure Shell or Putty/PSFTP from the download page.
- SSH Secure Shell is a better program, however Putty/PSFTP does not require any installation
Either way, run the executable file you have just downloaded
If using SSH Secure Shell, install with the default options.
- Set Up a Profile
With SSH Secure Shell:
- Run "Secure Shell Client" from the Programs Menu (Start, Programs, SSH Secure Shell)
or "Secure File Transfer Client" for SFTP.
- Click the "Profiles" button and choose "Add Profile"
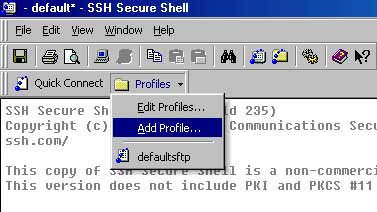
- Give the profile a name like: 'CSI Unix'
- Click on the "Profiles" button again and choose Edit Profile.
- The "Host Name" is either remote1.unl.csi.cuny.edu or remote2.unl.csi.cuny.edu or
remote3.unl.csi.cuny.edu or remote4.unl.csi.cuny.edu
- The "User Name" is your Unix account name
- You can accept the rest of the default settings
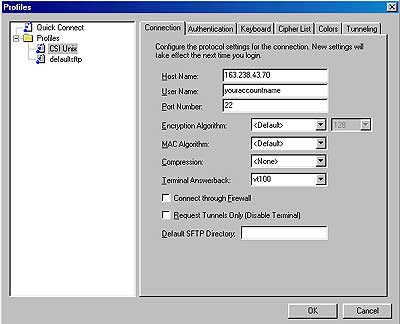
- Click OK.
With Putty:
- The "Host Name" / "IP Address is either: remote1.unl.csi.cuny.edu or remote2.unl.csi.cuny.edu or
remote3.unl.csi.cuny.edu or remote4.unl.csi.cuny.edu
- The Protocol is "SSH" (be sure to choose it since "Telnet" is the default)

- Log In
With SSH Secure Shell:
- Click on the "Profiles" button one more time and choose your newly created session.
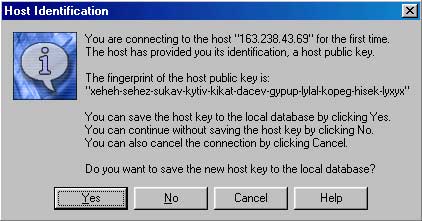
- If you are asked to accept a public key, choose 'Yes'
- Enter your password and you're in!
With Putty:
- If you are asked to accept a public key, choose 'Yes'

- Enter your username and password and you're in!